
 Save
Save
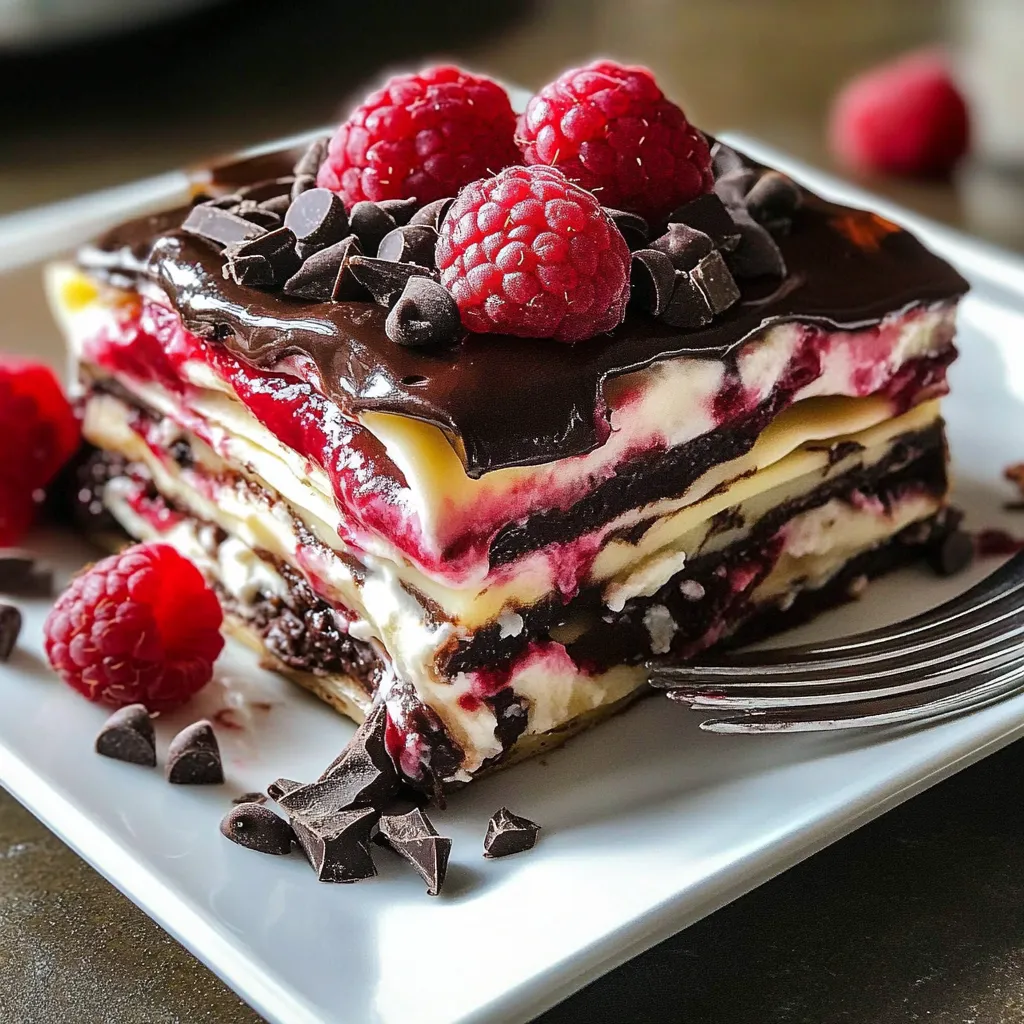
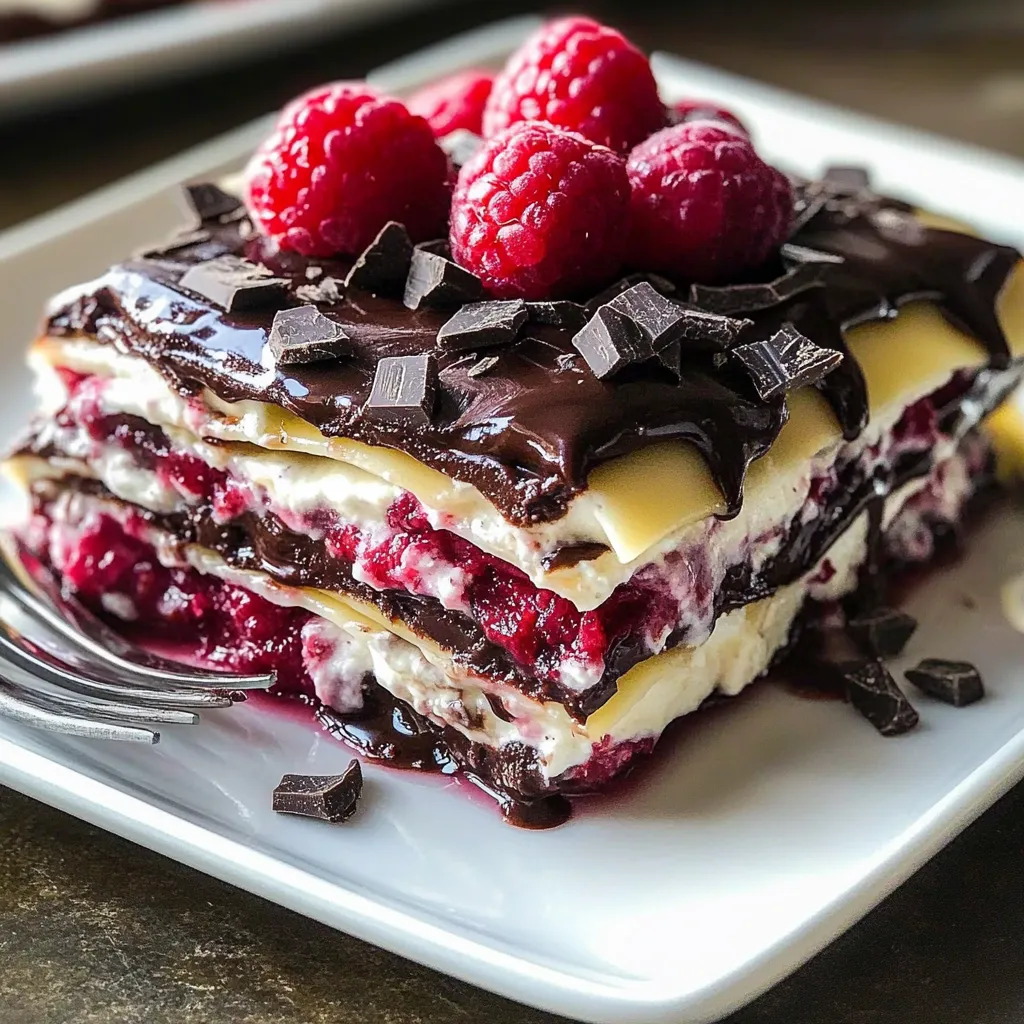
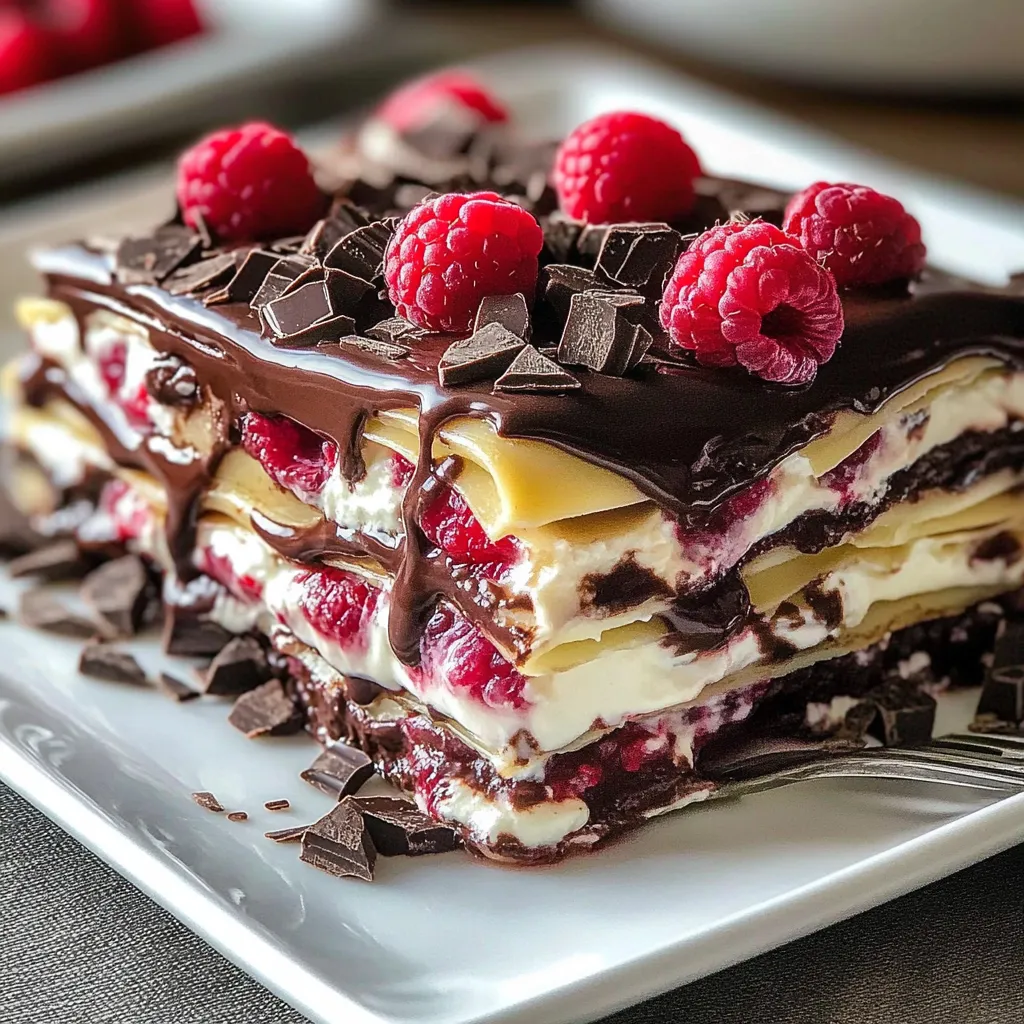
Raspberry chocolate dessert lasagna transforms simple ingredients into a show-stopping layered creation that satisfies both chocolate lovers and fruit enthusiasts alike. This no-bake masterpiece features a crunchy chocolate cookie base topped with velvety chocolate pudding, tangy raspberry-infused cream cheese, and a cloud of whipped topping that creates the perfect balance of flavors and textures in every bite. Each colorful layer contributes its own personality to the dessert – rich chocolate depth, bright berry freshness, and creamy sweetness – while requiring minimal effort and absolutely no oven time. I discovered this recipe when hosting a summer gathering where turning on the oven seemed unbearable, and it's since become my signature dessert for occasions when I want to impress without breaking a sweat.
I first served this at a family reunion where my cousin, a self-proclaimed 'dessert snob,' asked for the recipe before even finishing her first bite. There's something magical about how the layers maintain their distinct flavors while melding into a harmonious whole. The contrast between the cool, creamy texture and the occasional crunch from the cookie base creates an experience that keeps you coming back for 'just one more bite.' Even my father, who typically avoids fruity desserts, declared it the perfect balance of chocolate indulgence and refreshing berry flavor. The way the vibrant raspberry layer peeks through when sliced makes it as much a feast for the eyes as for the taste buds.
Fresh Ingredients
- Chocolate Sandwich Cookies: Create the perfect crunchy foundation with built-in sweetness and chocolate flavor. Removing the cream filling is optional but creates a more intense chocolate base.
- Cream Cheese: Provides tangy richness and structural integrity to the filling layers. Full-fat varieties offer the best flavor and texture.
- Fresh Raspberries: Contribute bright color and vibrant flavor that cuts through the richness of the other ingredients beautifully.
- Quality Chocolate Pudding: Delivers silky smooth texture and deep chocolate flavor. Homemade pudding offers superior taste, though instant varieties work well for convenience.
- Heavy Whipping Cream: Creates light, airy texture when whipped and adds richness to multiple layers. The high fat content ensures stable peaks and luxurious mouthfeel.
- Powdered Sugar: Sweetens without grittiness and helps stabilize whipped components. Its fine texture dissolves completely for smooth fillings.
- Pure Vanilla Extract: Enhances all the other flavors with warm, aromatic notes. Pure extract rather than imitation makes a noticeable difference in the final taste.
Assembly Method
- Create Perfect Cookie Base:
- Begin by preparing a foundation that will support all the luscious layers to come. In a food processor, pulse chocolate sandwich cookies until they form fine crumbs with no large pieces remaining. For the most intense chocolate flavor, scrape out the cream filling before processing, though this step is optional. Transfer the crumbs to a medium bowl and drizzle with melted butter, stirring until the mixture resembles wet sand and holds together when pressed. The precise amount of butter may vary slightly depending on your cookies; the goal is a cohesive mixture that isn't soggy. Press this mixture firmly into the bottom of a 9x13-inch baking dish, using the flat bottom of a measuring cup to create an even, compact layer. Pay special attention to the corners and edges, ensuring uniform thickness throughout. Place the crust in the refrigerator to chill while preparing the next layer. This cooling period allows the butter to solidify, creating a stable base that won't crumble when you add the filling layers.
- Craft Silky Chocolate Layer:
- With your base chilling, turn your attention to creating the rich chocolate layer that will deliver deep flavor. If using instant chocolate pudding, whisk the mix with cold milk according to package directions, but reduce the milk by about ¼ cup from what's called for. This slight adjustment creates a firmer pudding that holds up better in a layered dessert. Whisk continuously for about 2 minutes until the pudding begins to thicken. If making homemade chocolate pudding, cool it completely before proceeding. For extra chocolate intensity, consider adding 2 tablespoons of cocoa powder to the pudding mix before adding milk. Once your pudding reaches the perfect consistency – thick enough to hold its shape when spooned – retrieve your chilled crust from the refrigerator. Using an offset spatula, spread the chocolate pudding in an even layer over the cookie base, being careful not to disturb the crust beneath. Create a smooth, level surface that will support the next layer beautifully. Return the dish to the refrigerator to chill for at least 30 minutes, allowing the pudding to set completely.
- Create Vibrant Raspberry Layer:
- While the chocolate layer sets, prepare the showstopping raspberry cream cheese component. In a large mixing bowl, beat softened cream cheese with an electric mixer until completely smooth with no lumps – this may take 2-3 minutes on medium speed. Gradually add powdered sugar and a teaspoon of vanilla extract, beating until incorporated and slightly fluffy. In a separate bowl, mash fresh raspberries with a fork, leaving some small chunks for texture and visual appeal. If using frozen raspberries, thaw and drain them well before mashing to remove excess moisture. Gently fold the mashed raspberries into the cream cheese mixture until evenly distributed, creating a vibrant pink filling with bursts of fruit throughout. For a smoother texture, you can puree the raspberries and strain out the seeds before folding into the cream cheese. In yet another bowl, whip heavy cream until stiff peaks form, then gently fold this into the raspberry cream cheese mixture. The folding technique is crucial here – use a rubber spatula to cut through the center of the mixture, then sweep around and under, lifting and folding rather than stirring, to maintain the airiness of the whipped cream. Once fully incorporated, retrieve your dessert from the refrigerator and spread this raspberry layer evenly over the set chocolate pudding, creating another smooth, level surface.
- Complete with Cloudlike Topping:
- For the crowning glory of your dessert, prepare the final whipped topping layer. While store-bought whipped topping offers convenience, freshly whipped cream provides superior flavor and texture. If using fresh cream, whip 2 cups of cold heavy cream with ¼ cup powdered sugar and a splash of vanilla until stiff peaks form. The cream should be thick enough to hold its shape but still spreadable. Gently spread this final layer over the raspberry cream cheese mixture, creating decorative swirls and peaks with your spatula if desired. For a finishing touch that hints at what's inside, sprinkle the top with additional chocolate cookie crumbs, chocolate shavings, and a few fresh whole raspberries placed strategically across the surface. These garnishes not only enhance the presentation but also provide textural contrast and visual cues about the flavors within. Cover the dessert carefully with plastic wrap without touching the surface (toothpicks inserted around the edges can hold the wrap above the topping) and refrigerate for at least 4 hours, preferably overnight. This extended chilling time is essential for the layers to set properly and the flavors to meld together while still maintaining their distinct identities.
 Save
Save
I learned about the importance of properly chilled layers after a disappointing first attempt where the raspberry filling sank into the chocolate pudding. A pastry chef friend later explained that each layer needs time to set up and stabilize before adding the next. My family particularly enjoys this dessert during summer berry season when raspberries are at their peak flavor. My daughter has taken to helping assemble it, developing a knack for creating perfectly level layers that showcase the colorful cross-section beautifully. The dessert has become our tradition for celebrating good news, with family members specifically requesting 'the pink and chocolate thing' for birthdays and achievements.
Serving Suggestions
This versatile dessert shines in multiple serving scenarios. For casual gatherings, cut it into generous squares and serve on dessert plates with fresh berries scattered around for a pop of color and freshness. The contrast of the bright berries against the white topping creates a visually appealing presentation that hints at the layers within. For more elegant occasions, use a hot, clean knife to cut smaller, precise portions and serve on white plates with a light dusting of cocoa powder or powdered sugar around the edges. Add a small mint sprig and a single perfect raspberry on top of each serving for a restaurant-quality presentation. If serving for a special celebration, consider preparing individual portions in clear glass trifle cups or mason jars, creating mini layered desserts that showcase the beautiful colors and allow guests to see all the layers at once.
Creative Variations
Chocolate Mint Symphony: Create a refreshing twist by replacing the raspberry layer with a mint-infused cream cheese mixture. Add 1 teaspoon of mint extract to the cream cheese mixture and fold in 1 cup of chopped Andes mints or mint chocolate chips. Tint the mixture light green with food coloring for visual appeal. This cool, refreshing variation offers the beloved chocolate-mint combination in a creamy, layered form that's particularly welcome during the holiday season or hot summer months.
Peanut Butter Passion: Develop a rich, nutty variation by adding a peanut butter layer between the crust and chocolate pudding. Blend 1 cup of creamy peanut butter with 4 ounces of softened cream cheese and ¼ cup of powdered sugar until smooth, then spread over the crust before adding the chocolate pudding. Replace the raspberry layer with a vanilla cream cheese mixture for a dessert that pays homage to beloved peanut butter cups in an elevated form. This hearty variation appeals particularly to children and devoted peanut butter fans.
Triple Berry Bliss: Transform the fruit profile by using a combination of raspberries, blackberries, and strawberries in the cream cheese layer. This mixed berry approach creates a more complex fruit flavor while maintaining the beautiful pink color. Add 1 tablespoon of lemon zest to brighten the berry notes further. This variation showcases summer berries beautifully and offers a deeper fruit flavor that complements the chocolate elements perfectly. The mixture of berry seeds and textures adds interesting visual and textural elements to each bite.
Storage Success
Refrigeration Requirements: Store this dessert covered in the refrigerator for up to 5 days. The flavors will continue to meld, often making the dessert even more delicious on the second day. For best results, cool completely before refrigerating to prevent condensation from making the vegetables soggy.
Freezing Possibilities: While best enjoyed fresh, this dessert can be frozen for up to one month in airtight containers. The texture of some vegetables may soften after freezing, but the flavor remains excellent. Thaw overnight in the refrigerator before reheating, and consider adding a few fresh herbs after warming to brighten the flavors that may have diminished during freezing. Note that the texture of the fruit layer may change slightly after freezing, but the flavor remains excellent.
Revitalization Tips: If dessert has been refrigerated for more than a day, it may benefit from a flavor refresh before serving. A light sprinkle of additional vanilla extract, fresh cracked pepper, or a scatter of freshly chopped herbs like mint or basil can revitalize its appearance and taste. Allow chilled dessert to sit at room temperature for 10-15 minutes before serving to take the chill off and allow the flavors to open up.
 Save
Save
This raspberry chocolate dessert lasagna has become far more than just a recipe in my collection – it's a celebration centerpiece that friends and family now expect at gatherings. What began as a way to avoid using the oven during summer has evolved into a signature dessert that I'm known for bringing to potlucks and parties. There's something deeply satisfying about watching people's expressions when they first see the beautiful layers revealed in each slice, followed by the moment of appreciation when they taste how perfectly the flavors complement each other. The fact that it's so simple to prepare yet looks so impressive makes it my secret weapon for entertaining success – a reminder that sometimes the most loved recipes aren't the most complex, but rather the ones that reliably deliver both visual appeal and delicious flavor with minimal stress for the cook.
Common Questions About Cooking
- → Can I use different berries in this dessert lasagna?
- Absolutely! While raspberries offer a nice tartness that balances the sweet chocolate, you can substitute with strawberries, blackberries, or a mixed berry blend. If using strawberries, dice them into smaller pieces before mixing. Blueberries work too, but you may want to lightly crush them to release their juices into the cream cheese mixture.
- → What if I don't want to remove the cream filling from the Oreos?
- It's perfectly fine to keep the cream filling in the Oreos! The original recipe suggests removing it for a less sweet crust, but many people prefer to use whole Oreos with the filling intact. If you do this, you might need fewer cookies (about 18-20) and slightly less butter (around 5 tablespoons) since the filling adds moisture to the crust.
- → How far in advance can I make this dessert?
- This dessert lasagna can be made up to 2 days in advance. Keep it covered in the refrigerator until ready to serve. The flavors actually develop nicely as it sits, making it a perfect make-ahead dessert for parties or special occasions. If adding fresh fruit as garnish, it's best to add that shortly before serving.
- → Can I freeze this dessert for later?
- Yes, you can freeze this dessert for up to 1 month. Cover it tightly with plastic wrap and then aluminum foil to prevent freezer burn. Thaw overnight in the refrigerator before serving. The texture of the raspberry layer might change slightly after freezing, but it will still taste delicious.
- → What can I substitute for Cool Whip?
- If you prefer not to use Cool Whip, you can substitute with homemade whipped cream. Beat 2 cups of heavy whipping cream with 1/4 cup powdered sugar and 1 teaspoon vanilla until stiff peaks form. This will yield about the same amount as an 8 oz tub of Cool Whip. Note that homemade whipped cream isn't as stable, so the dessert may not hold up as long in the refrigerator.